Remote Control of the radio shack is implemented using a local PC in the radio shack to control the FTDX101D rig using WIN4Yaesu. Other key equipment like the rotator for a 20/15/10 Yagi and the directional control for a SAL-20 low-band RX receiving antenna are also controlled via the desktop. Antenna switching and band-segment tuning are automatically controlled locally in the shack using information from the FTDX101D. A 2-way audio connection over the Internet is supported using Zerotier and Mumble. The local Dell Optiplex 5060 radio shack PC running Windows 11 is then remotely accessed by a remote laptop PC using Chrome Remote Desktop (free for personal use remote PC access application) over the open Internet. Zerotier and Mumble are also free for personal use. These methods avoid IP addressing problems, which can be difficult, since Zerotier and Chrome Remote Desktop network servers route the remote access links for the user for control and audio.
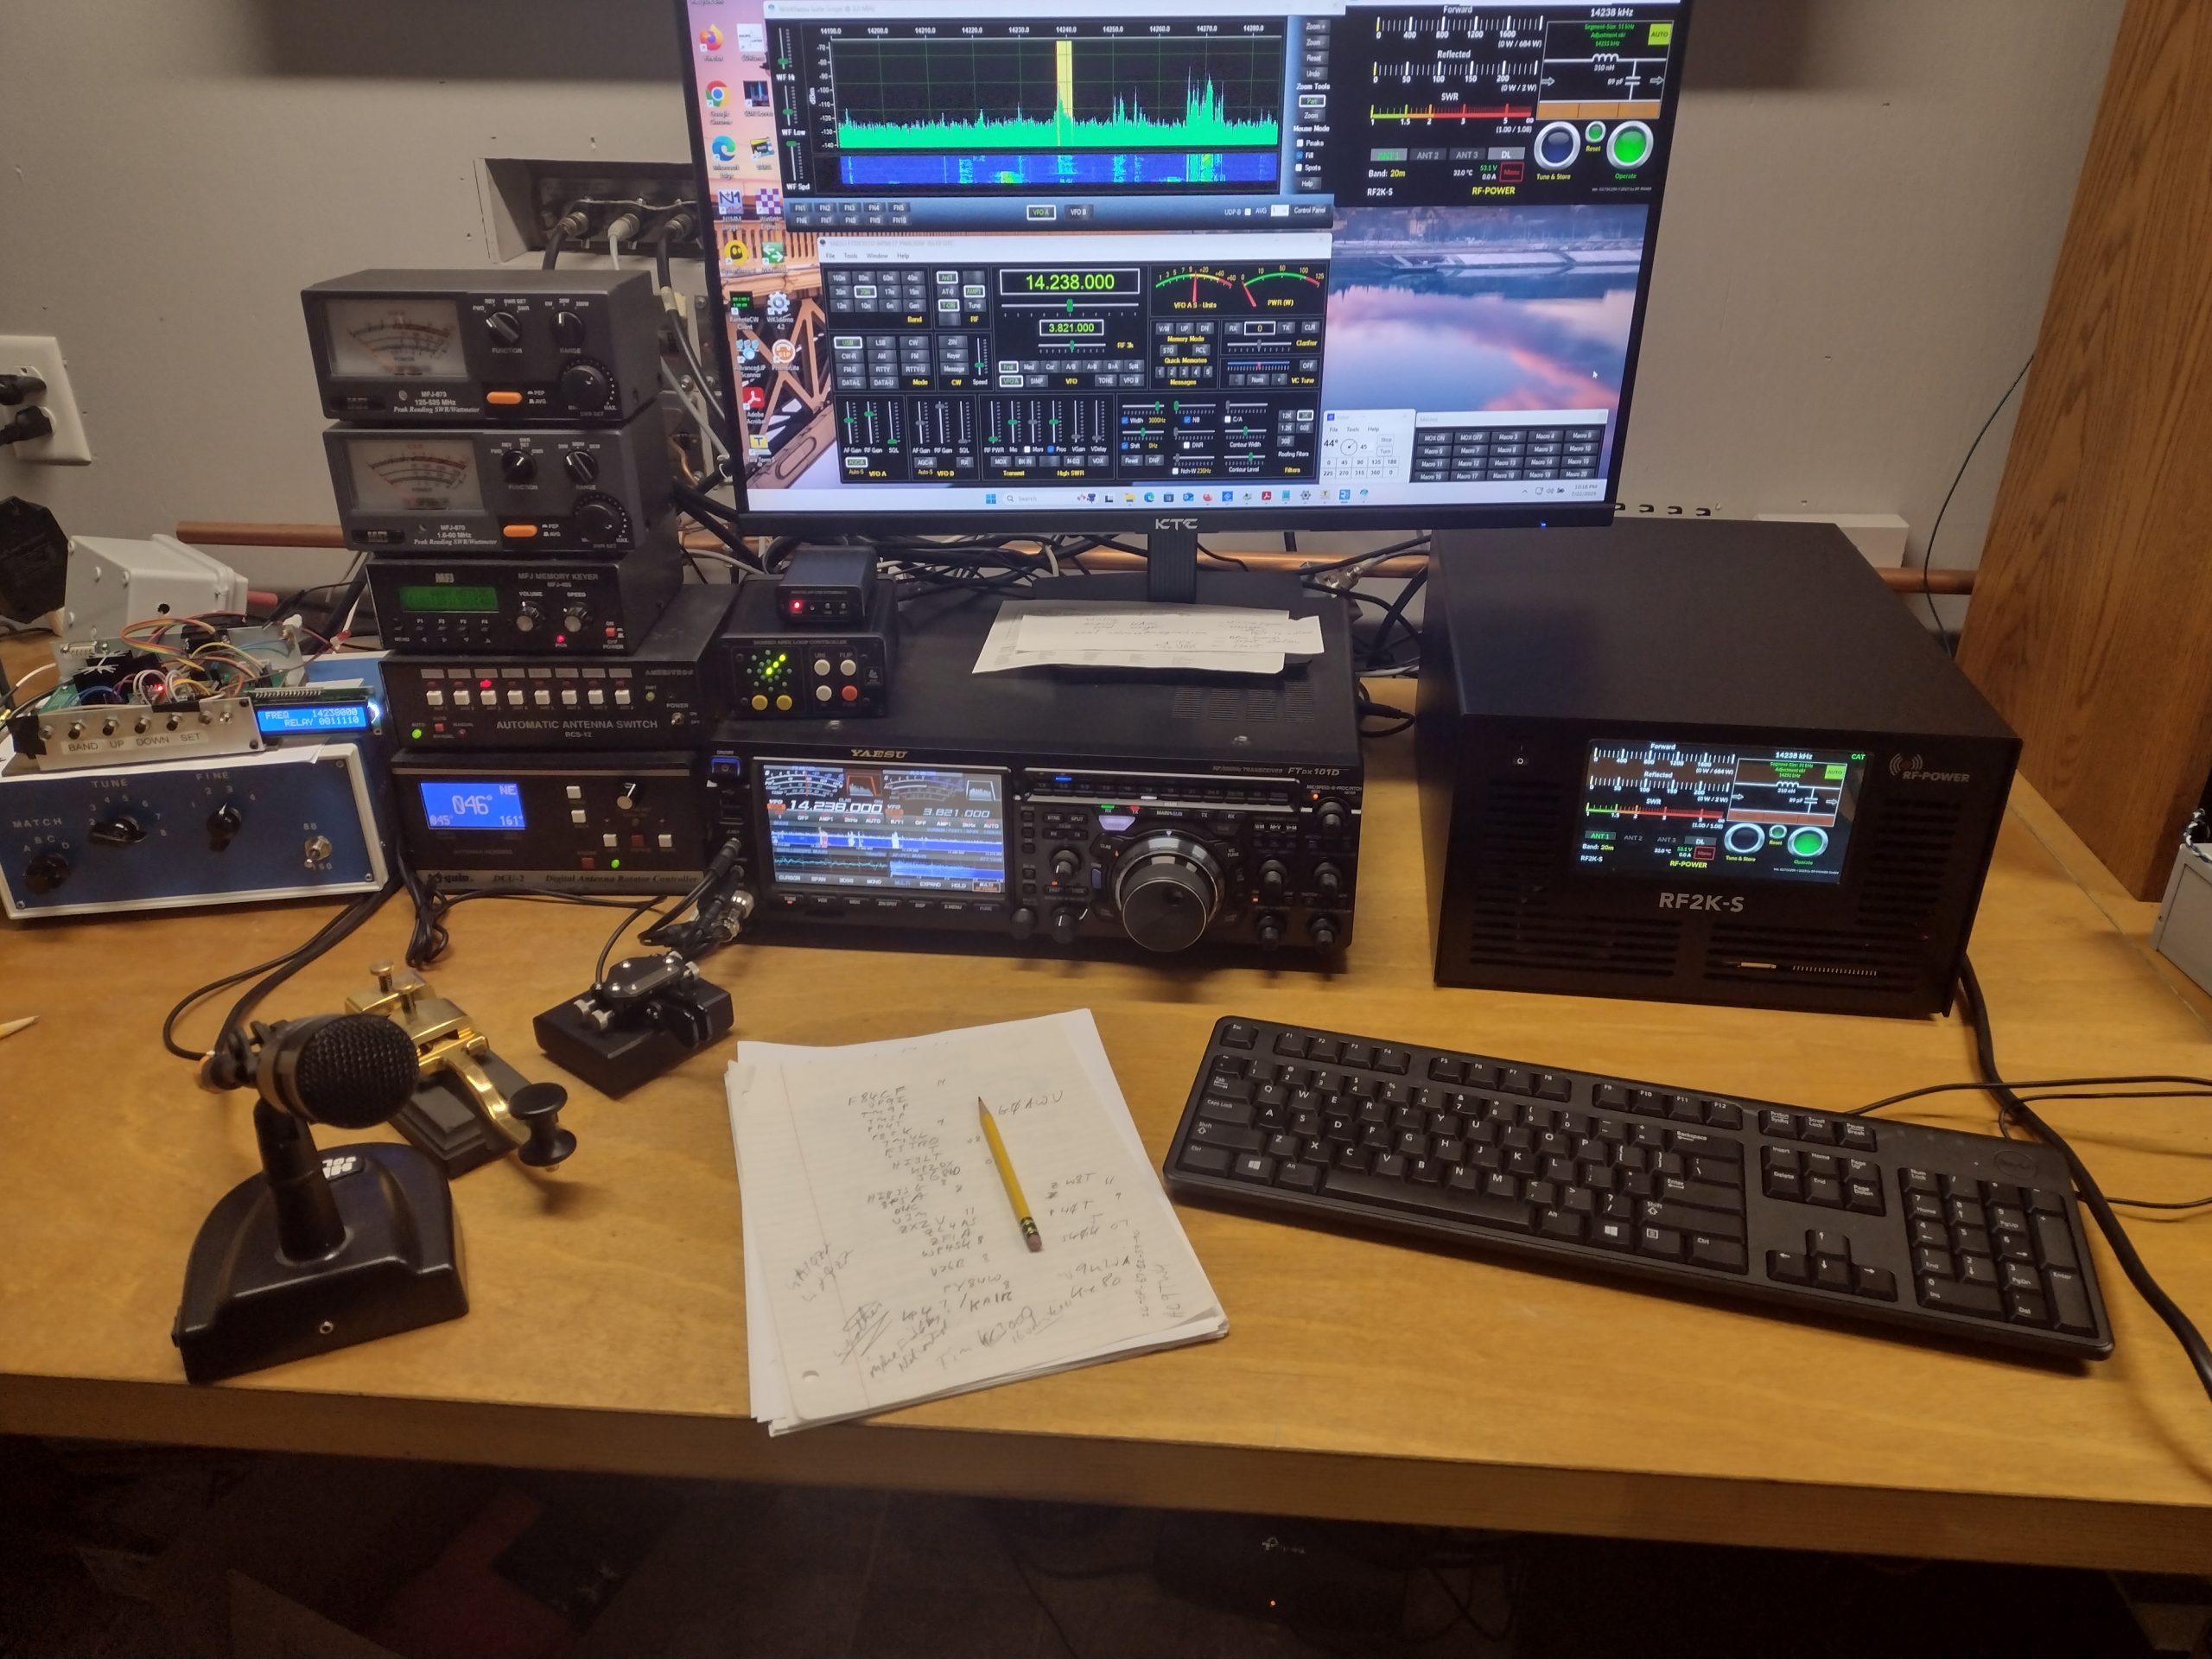
In the pictures below, Win4Yaseu can be seen on the display at the lower left. At the top is a spectrum scope display supported by Win4Yaesu using a SDRplay RSPdx. And to the top right is the Windows VNC control interface for the RF2K-S linear amplifier.
This method allows for good flexibility in configuring the system and gives you the power of an open PC in the radio shack which is then also available for general use in the shack. This method also avoids common problems with IP addressing for remote access. In my case, which is for an isolated QTH, cable service is not available, and I use T-Mobile Home Internet service over 5G cellular. Unfortunately, they use an IP addressing scheme called CGNAT which combines dynamic IP addressing with sharing of a single IP address among a number of end users. Conventional Open Port and Dynamic DNS is not sufficient. This problem exists also for Verizon and AT&T Home Internet services and for Starlink. Solving the CGNAT problem for remote access directly by the end user appears difficult . However, by using Chrome Remote Desktop for control and Zerotier and Mumble for 2-way audio, the problems of CGNAT are solved by the network servers of those services.
The downside of using a desktop PC for control and audio in the radio shack is a requirement to setup and configure a number of PC programs. Many hams have setups for remote ham radio systems. Some prefer systems built specifically for remote ham radio operation. Many also use software systems such as HRD. Some systems now optimize for remote operation such as Flexradio.
A remote control set up is shown in the picture below using a Dell Optiplex 5060 small form factor PC and dual QHD 27 inch monitors.
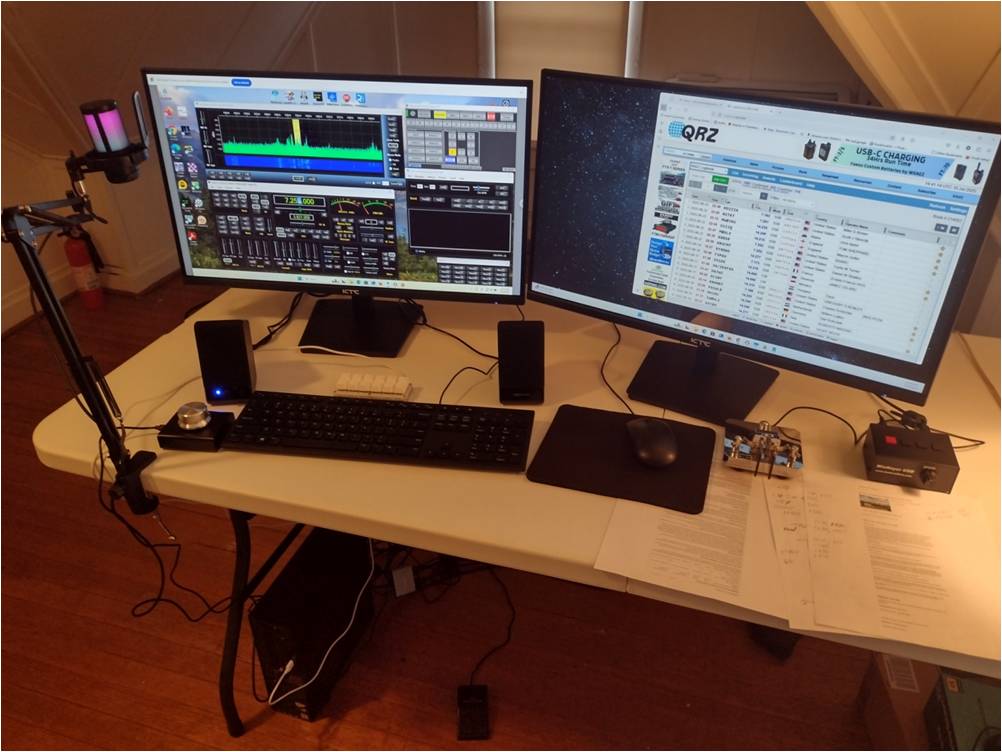
The USB knob can be used for frequency tuning and the 12-key keyboard can select 1000, 100, 10 or 1 Hz steps, or 4 CW messages or 4 input points on the screens such as N1MM logging using AutoHotKey scripts. The WINkeyer USB is too the right, a USB foot pedal for PTT is on the floor and a USB mic is on the boom.
Radio Shack Remote Operation with Zerotier
Details on the remote control system set up are in these slides.
The list of items which are controlled remotely for my shack are:
- Yaseu FTDX101D using Win4Yaesu on the PC for control with a spectrum scope waterfall using a SDRplay RSPdx
- RFPower RF2K-S 1500 Watt linear amplifier using VNC over Zerotier
- Hy-Gain DCU-2 rotor controller (using N1MM rotor control SW)
- SAL-20 RX antenna for 160/80/40 with 8 selectable bearings using Hamation ShackLAN control center
- Winkeyer is used for CW transmission using keyboard input and one-click messages
- RCS-12 Ameritron Antenna switch which tracks the rig’s band in automatic mode
- Shack PC (using Chrome Remote Desktop)
- Power strip (4 independent outlets controlled via smartphone app)
- 1080p camera to monitor the radio system in the shack (via smartphone app)
For remote operation, a 20/15/10 Yagi is automatically selected by the RCS-12 on those bands. On 160, 80 and 40 meters, a Hy Tower (modified to add 160 meters) is automatically selected for TX by the RCS-12 and a SAL-20 is selected for RX by the FTDX101D.
An UPS rated for 1000VA provides power for the PC, rig and the entire setup required for remote operation. Following the UPS, a WiFi power strip supports turning ON/OFF the entire system remotely. This allows power cycling the PC and all of the equipment in case of a failure as long as the WiFi power strip is functioning which is important for reliable remote operating. A WiFi AP is located in the shack to provide a strong signal for the WiFi power strip and other shack located devices. The WiFi AP connects over Ethernet to a point-to-point WiFi panel with a short line-of-sight connection to the T-Mobile Home Internet box.
As other hams have noted, the PC in the radio shack must be configured to fully boot all the way to the user account and then automatically launch Chrome Remote Desktop. Some of the key issues are to configure the boot to automatically launch Windows, not requiring a password to enter the user account, and installing Chrome Remote Desktop for remote access. Chrome Remote Desktop allows the remote PC to be controlled very close to 100% as if you are at the remote PC. Three issues needed to be addressed. Changes were required in Windows Registry files to bypass the Windows Welcome Screen and the User Login Screen. Instructions from these sources were used for Windows 11 changes.
https://www.youtube.com/watch?v=JsnViEchX5Q
In addition 2 BIOS changes in the Dell Optiplex 5060 were needed to cause the PC to boot when AC power was enabled from a WiFi controlled power strip:
In BIOS: set AC Recovery to Power On, set Deep Sleep Control to Disabled.
Some hams use Skype for 2-way audio for remote audio connections. Some have used the 2-way audio built into TeamViewer and Chrome Remote Desktop can provide audio. I found various issues with each of these including difficult authentication processes or problems controlling the audio processing, and I ended up using Zerotier and Mumble which provide low delay operation and are free to use by individuals.
At the control laptop, A gamer’s USB mic with a boom-mount is used for TX and either headphones or an external speaker are used for RX. At the shack, the TX audio connects to the rig from the desktop PC over the same USB connection to the rig that is used for control. That USB interface to the FTDX101D includes both TX and RX audio and could be used directly for voice and digital contacts. However, the Yaesu USB audio DOES NOT INCLUDE THE CW TX SIDETONE. The CW sidetone ONLY is available externally through the front panel audio jack. So, the RX audio is accessed there.
A 100 Watt dummy load connects to antenna 2 on the FTDX101D allowing for testing of just the rig and a 1 kW dummy load connect to antenna 4 on the RF2K-S allowing for testing at full power without radiating the signal.
Ground loops in the audio connections from the rig to an external audio device for the PC are a common problem and will almost certainly be an issue for anyone setting up remote operations. I found there are inexpensive stereo isolation transformers available with standard 1/8″ stereo plugs/jacks that are easily installed for receive audio in the system and that eliminate the ground loop problems. The USB audio interface internal to the FTDX101D should address this problem internally.
To switch from remote to local operation, only 2 things are needed:
- Unplug from the FTDX101D front panel the 1/4″ plug in the audio jack
- Under mic audio source the FTDX101D for SSB, switch from “Rear” to “Front”
The interfaces from the PC to the rig and other equipment are as follows: 8 USB interfaces are available on the PC and 4 serial ports using 2 PCIe dual serial port cards.
- USB interface to the FTDX101D
- Serial interface to the RF2K-S CAT USB interface using an FTDI USB to serial adapter and a null modem cable – this interfaces in software to a virtual CAT port provided by WIN4Yaesu
- Serial interface to the DCU-2 rotor controller
- Band information cable from the FTDX101D linear amp output connector to the RCS-12 remote antenna switch
- USB interface to the Winkeyer (the Winkeyer output is wired in parallel to a local keyer and straight key going to the FTDX101D CW Key input)
- Serial interface to the MFL-495 keyer
- 1/4″ audio plug for the headphone jack to an audio isolation transformer and then to an external USB audio device
A number of RFI suppression toroids are used. FT240-31 cores are placed at both ends of the USB cables with 6 or so turns. A double FT240-43 core is placed with 6 or 7 turns of the 220V power cable for the amplifier near the power connector on the back of the amplifier. Heavy ground bonding to the shack’s 3/4″ copper ground pipe running the length of the operating table on the wall connects to the rig, amplifier, PC and other equipment.
Shack setup for remote operation
1 – Place rig coax selection switch in position 1 to select the FTDX101D & RF2K-S
2 – Leave FTDX101D power switch in ON position and 12V power supply ON (power is turned ON/OFF remotely by Jinvoo smart power strip) – leave the amplifier power switch in the OFF position (it is turned ON/OFF via the remote power control +12 VDC input connector)
3 – Select TX audio source for SSB to “REAR”
4 – Connect FTDX101D headset jack to audio cable to PC external USB audio device
5 – Check that rig camera is working OK
6 – Test remote control prior to leaving the shack: powerup, rig, rotor, keyer, camera, powerdown, test phone & CW transmit using a dummy load
7 – Mumble is set for 10 msec frames and 100 kbps coding rates with no audio processing (no echo control and no noise suppression) to achieve minimal delay
Startup for remote control
1 – Turn on power in shack with Jinvoo smart WiFi powerstrip using smartphone
2 – Wait 1 minute for shack PC to boot
3- Start Chrome Remote Desktop on local PC and connect to shack
4 – Open Win4Yaesu in shack, (rig should already be powered ON)
5- Open VNC and connect to the RF2K-S for amplifier control
6 – Start Mumble server and client at shack and the client on the local PC – start a connection – now should have audio from the RX & audio to TX is ready – check audio device connections on both ends if any missing audio – TX audio can be tested by transmitting with a dummy load
7 – Open N1MM Rotor in shack to control rotator
8 – Open ShackLAN Control Center and the SAL-20 control window
9 – Open Winkeyer
10 – Open camera in shack to see equipment
11– for phone operation use the MOX control remotely for PTT operation with a USB foot pedal if available
12 – for CW operation, select the remote Winkyer app, then select preprogrammed messages to send or type to send custom text
Shutdown after remote operations
1 – Do a remote PC Windows shutdown in shack and wait about 30 seconds to allow a clean shutdown
3 – Power off shack remote equipment with the Jinvoo powerstrip controller